Showing posts with label fibers. Show all posts

Wednesday, November 2, 2016

Making A Wedding Dress, Part 2


OK, where was I?

Ah, yes, commence with the pleating!


When we left off, I had finished my under-pinnings and was ready to add the final fashion fabric to the dress. I had always envisioned a pleated wedding dress for myself but had never attempted intricate pleating before. I was lucky enough to find a ThreadsMagazine.com article where a group had actually taken a pleating class with the former head of Madame Gres' couture workroom! AND shared the instructional on the internet!! I was so grateful for the instant (with paid subscription) tutorial, and it was the inspiration for me to also take the time to share what I've learned in this process with YOU.

I discovered that pleating requires A LOT of pins. I always prefer extra-fine glass-head pins; they're gentle on delicate fabric and won't melt if you iron over them. I don't even own steel-head pins because they feel thick going through fabric, I struggle to grasp them and they get lost in my pin cushion. I blew through my glass-head stash quickly and found myself scrounging on the floor for strays to finish the job. You start pleating from the bottom layer (the sides of the bodice) to the top layer (the cups), making it easy to hide raw edges. So, the ends on the right side of the image above just needed to be thinned of their fullness and would soon be hidden.

Once the pleats are pinned in place, now comes the curved needle. You gently fold back each pleat and run long running stitches onto the pleat directly below it. Thus when you return the folded pleat, it will hide the stitching. I put paper in between my dress form and my corset, so that I could hear and feel when I had sewn through all desired layers and NOT caught the fabric of the dress form itself. Oh, the sadness that would've been to do all this beautiful work and not be able to take it off the form!


I found the running stitches were much easier to execute if I could lay the form on its side and be able to work upside down. I initially tried this on my studio table but soon found sweat running down my body (due to maximum summer temperatures and minimal A/C) and, let's be real, sitting on a table is uncomfortable. SO, I hauled my form into the house, put on a long-running stream of Murder, She Wrote, and stitched away!


When I finished with the two side sections, 1) I breathed a sigh of relief, they were the largest sections of pleating! and, 2) hobbled my sweaty, determined, pin-pricked ass back into the studio with the form to set up the pleating in the center of the bodice. The house is more comfortable... but the studio has better lighting...


This area proved more challenging because of symmetry. As all dressmakers know, the front left and front right of a garment typically mirror each other down the center front line. But how do you achieve symmetry if your pleats all go in one direction? Follow me? Each side can't be treated in the same manner because the pleats are folding differently. So, I did my best to make them look the same practice letting go of perfection. I considered reversing the pleats down the center front but ultimately didn't like the look of it. It was worth testing it out though. I also had enough time time that, if I wasn't sure of a design idea, I would allow myself to stop and step away; giving myself time to mull things over.

On the left, Trial A.... just didn't win me over. On the right, the final design for the cups.

When you're in a hurry, it can be desirable to stick with your first idea, but remember the big picture, with an emphasis on the word "picture". These wedding photos will be up in your and your families' homes for perceivably the rest of your life. Make sure you're happy with your dress before your past the point of NO RETURN. hehe

The cups were the most challenging because they involved shaping over a curve. The corset was a blessing because I knew it fit me, so all I had to do was follow their shape make sure to not distort them at all during the process. And since I had all the pleat practice leading up to them, I was the most confident and comfortable as I would ever be!


TA-DA! 
Once the pleats were done, a lovely bridesmaid came over and helped me play with strap ideas (and convinced me to take the time to clean up the hem with a rotary cutter). I chose this standard strap design because I had gotten pretty badly burned at the beach earlier in the year and decided to match my straps to my tan.... (PROFESSIONAL WEDDING TIP!!!). I sorta made up a little twisty thing with the excess fabric from the back pleats to cover up the zipper teeth. I used a plastic separating jacket zipper that I shortened to attach to the corset. Then the back skirt crossed over the center back opening and got a hook-and-eye closure over near my left side body.


It was a comfortable dress to wear, easy to get in and out of, and thank goodness for those front slits because every time I started getting hot, I was able to stick my leg out and cool myself off!! Seriously, it helped! The only uncomfortable-ness I felt was when a hidden mob of guests bombarded us with uncooked grits flying at our face, which proceeded to get lodged in my cleavage for the rest of the night. Pretty sure they were fully-cooked by the time I took my dress off!!

I also made Adam's linen shirt and jeans. I honestly think working with the linen was harder than my entire dress! The tissue cotton worked beautifully to pleat, thin but stable. 


Thanks for following my journey on this most-ambitious project. I thoroughly enjoyed the process and would recommend any enthusiastic sewer to give it a shot! Set manageable goals (in terms of fabric choices and techniques), understand your work ethic and how much time you need, and don't be afraid! Be willing to seek out advice (I'm an open door!) and maybe have a backup plan just incase. If only for the easement of your mother's nerves :)


Saturday, November 21, 2015

Fall Activities

Gravy once again finding my work table, and all the projects I'm currently working on, a pleasing place to nap.

Hey everybody! 

I have been up to a ton of stuff this fall and am very pleased to say that not much of it has been freelance work-for-hire crap. I am whittling it out of my life and it feels great! Still got a couple loose ends I have to finish up before I can state that I am completely free. And I'm serious when I say free. Doing work for others comes with a level of stress -- knowing that someone else is holding you to a deadline, the need to live up to others' expectations, etc -- and those things had a way of weighing heavily on one's shoulders. I think that's why school wasn't such a great fit for me. I work a lot better holding myself to deadlines rather than to be pressured by others, which I have recently realized about myself. AND it is a very crucial thing to have some insight on when you are attempting to work for yourself.

See how much the original lining had disintegrated?

I recently finished up a project that I was somewhat stressing about, so much so, that I put it away and promptly forgot about it (psst for a whole freaking year!). Ok, ok, lemme explain. It was for a friend, someone who had done favors for me in the past and I was wanting to do it for free for him. What happens when you lack financial compensation? You put it off.

Of course, that all seems so silly now because was it not nearly as difficult or time consuming as I had dreaded it to be ---- re-lining a leather jacket including all the pockets. It actually was kinda fun! Well, after the tedium of seam-ripping the whole thing, and trying to do a clean job of it so I could use the original pieces as guides to cut the new fabric.

And what I was dreading the most was if my sewing machine could handle all that leather. It worked so well it blew me away. I do have an industrial machine but I don't have a walking foot. Sweet relief! And I'm now thinking that I have some room to ask him for another favor... 
#strategy


I met a herd of knitters in Greensboro, working on a large yarn-bomb intended to cover the whole Walker St bridge. They were very relieved when I showed up with my bulky hobby knit machine (did I mention someone gave me one? As in fo free??). I let them borrow it to help with the boring stuff. We met in the back of Shelf Life, a new, independent art supply store in town, and how great is the atmosphere? I just thought these pictures were fun and colorful.

I was able to donate some practice knits that I didn't want to throw away. Those green-and-white swatches forming the "H" were from when I was just learning how to use my fabulous standard gauge knit machine.

Speaking of knitting machines...

Did I tell y'all I got picked to be a pop-up artist-in-residence at the Greenhill Center?? 10 days in their ArtQuest space, to set up whatever work I wanted to do and to interact and engage with the kids and families that came through the space.

I attempted to try and get the kids to draw their own knitting designs on graph paper, with an emphasis on drawing houses, since I've been making a lot of houses this year. It failed miserably but I had a back-up plan consisting of using those pot holder loops to teach finger knitting and a bag-full of pom-pom makers. Isabella did draw her guinea pig and I was thrilled to use the machine to knit it for her.

So maybe I wasn't able to get the kids to directly interact with a project that I was working on, but I at least promoted the name of fiber arts. And who doesn't like pom-poms?? 
If you can see in the earlier picture of my knitting set-up, I had that bulky hobby machine out (bottom right) for anyone interested and during my time there I had 2 groups of kids that got really into knitting on the machine. As in, one group (consisting of 2 brothers and a grandpa) came back the next day just to work on the machine! It surprised me, I wasn't sure how they would take to it but the older brother especially (probably 9 or so) could use it with minimal help from me. And they were able to knit an entire scarf to take home with them!

At the end of my time, I had done more socializing, networking, and playing with the kids, rather than making any art. It still felt like a success though. It's always exciting to share activities with kids that engage them. As in...

 ...this one little girl that came to family night was finger-knitting, and I was basically putting the loops on her fingers for her. .. and doing the knitting part ... she was pretty much just holding her hand there. Then slowly she started taking over for me, one step at a time, to the point that she didn't need me anymore. And every time that she would finish a "row" of fingers, she would hold it up for me to see and just beam with joy and satisfaction. I got a lot of enjoyment out of watching her.


Family time out in the backyard.
This photograph is titled "How to keep the 2.5-yr old entertained and outta trouble". I am jealous of that full-split, Susan! Talk about open hips! She must be made of playdoh :)

Friday, August 7, 2015

How Peanut Shorts Led Me To A New Business Venture


Something that I'm recently discovering is vitally important for creative types/business entrepreneurs/designers/makers/discoverers/ME : making time to play

In the words of Carrie Bradshaw, I tend to "should" all over my life. "I should be responding to that client's email", "I should be regularly posting updates on Facebook", and the biggest one "I should be making more money". I am certain now that all that "should"-ing has held me back from growing my career and discovering what I really want to do.

If a scientist doesn't make time to experiment, how will she be able to discovering anything new?

If a chef doesn't make time to try out unfamiliar ingredients, when will she ever develop new recipes?

I allowed my fear of needing to make money keep me from playing in my studio. I took other people's stressful jobs, things I didn't even want to do, just for the money and prevented myself from discovering ways to take my own creativity and turn it into a career, on my own terms. 

It's ok, it only took me like 3 years to figure this out but, hey, better late than never. 

So let me tell you about my new business idea...

 .... I'll give you a hint, it's not modeling!

A couple weeks ago I made myself a pair of cotton shorts on a whim. It was hot, and I couldn't find my other pair. I'm sure there were other things I could've been doing that day but I chose to prioritize this project. Then I wore them every day for the next week. I was obsessed with these shorts!

My #1 man encouraged me to post a pic on Instagram and see if anyone else wanted a pair, and people were interested! The next day I went back into my studio and assessed that I had enough peanut wax print fabric to make 6 more pairs. So I threw the offer out there via Insta:

6 pairs available
$36 flat + free shipping
first 6 people to respond get em'
who wants em'?

I learned with my pair that it's nice to have a tag to easily identify front from back -- personalizing the tags makes it all the more fun, and a nice surprise for my clients.

I was sold out within the hour! 

That night I sent out invoices via Square (--> unbelieveably easy! Highly recommend it. BUT Venmo is the best to be able to avoid any processing fees, seriously, no fees! Only catch is you and your client both need to be signed up to use it. With Square, your client only has to enter payment info and that's it.) I also sent out emails with instructions on measuring your body.

Then all I had to do was wait for these 6 guinea pigs to fulfill their end (payment + measurements) and I happily sewed up their orders as they came in. It was enjoyable work that I created in my own studio, I was able to use up all this beautiful fabric that had been sitting around collecting dust. It overall was a great experience. I actually ended up selling more than 6 because I had a couple friends that saw more fabrics sitting around my studio and requested shorts in those alt. fabrics.

Peanut shorts seen in the wild!

My co-worker Gillian snapped this shot in her new shorts, made with another wax print fabric I had lying around.

Doing this little experiment got me really excited about the idea of creating more limited edition garments. It absolutely fits so many things that I love, those things being...

1) creating unique garments,
2) flexing my pattern-making skills and seeing them thru to full development,
3) small business, small production, small enough work that I can do by myself, 
4) providing others with a chance to purchase clothing outside of the "big box", 

...not to mention providing a custom fit! If only I could stand on a soapbox and preach the glories of clothes that are made specifically for one's body. I shutter at the thought that most of us wander this earth wearing garments that only kinda fit right. Or gosh! people that don't even realize what well-fitted garments look and feel like! Their ignorance pains me! I know the Truth! Follow me and I can make you look like you lost 20 pounds just with the magic of my sewing machine!

My favorite is to create a garment and fine-tune it till I can say this is a quality product. That means wearing it and judging its fit, washing it and seeing how the fabric wears. I'm a true sample-maker at heart, the engineering of it all is what I live for.

This is me creating a non-committal clothing line, as inspiration strikes and time permits. I love the freedom of this idea and I've got so many more garments I'm getting excited about offering. For this first go-round, I only advertised on Instagram but there's possibilities of expanding to other social media outlets and email marketing (join my mailing list here).

What do you think? Would you buy clothing in this manner? What platform do you think is best for this sort of business venture?


Wednesday, July 29, 2015

DIY Wedding Guest

Spent the afternoon watching "The True Cost" documentary and knitting organic, hemp fabric scraps that I got from work. YES it was a perfectly-sunny summer day and YES I had more productive things I could've been doing (I'll refrain from photographing the dishes in the sink and my suitcase opened in the middle of the floor), but this, this was ME time and it felt utterly refreshing.

Remember how I was struggling to post any updates at the beginning of this year because I was so busy? Well, I'm still busy and it looks like I won't get any breathing room until October comes and goes. The main culprit? Weddings! I'm at that age and am reaping the benefits (and financial burdens) of investing in so many personal relationships over the years. 

So today I'm knitting pot holders, and scheming on other DIY wedding gifts (I love these tea towels) I can create to show my love for all these beautiful people and keep my wallet in my pocket. Or at least save it for air fare.

Do you have any DIY wedding gift ideas? Plz share ASAP!

Sunday, June 21, 2015

Liking Isn't Loving


I am so stinkin' torn right now about this project. The problem is that I just don't love it, but I really like it. The "liking" part is making it hard for me to want to scrap the project all-together. It has merit, but it just doesn't create that "I'm so obsessed with this!" feeling like most of my other knit pieces illicit. So do I frog the project or do I invest the time in finishing it?

I just don't think the background colors are successful. My attempt to deepen the gradient helped but it's still too rigid, and then the separation between the 2 yellows disappeared so I'm left with the uneven distribution of colors. It feels weighted in the wrong ways.
Now here is a successful color gradient! I knit Hammered//Enamored by hand so, moving slower, I was able to assess the color-change much more closely. Also, only being able to view the backside of the knitting while using the machine, limits my visibility of what I am doing. 

I don't know what I'm going to do. I HATE feeling like I wasted my time or, even worse, that my art progress is moving at the pace of a fist fight underwater. I want so hard to be prolific and react quickly on my ideas but with all life puts on each of us, it can be tricky. And I'm just not a person that can forego all other life-fulfilling activities for the sake of my art career. Sometimes I wish I was.

Have you ever been stuck about making decisions like these? How do you work through them?

Thursday, June 18, 2015

Floppy Drives and Embroidery Hoops

 The view from my lap this week. Over the weekend I had a chance to spend some one-on-one time with a seasoned machine knitter from my guild, Cindy. She was so gracious as to allow me into her craft room and utilize some of her ancient, expensive, and highly-coveted (by me) technology.

SO, my knitting machine has electronic functions -- so far, I have only explored the more manual aspects of these capabilities -- but I knew there were ways to take designs directly out of the computer and upload them to the machine, bypassing any need to input the pattern by hand. I had no idea how, hence my idea to ask for help.

SIDE NOTE: This year, more than any other year, I have found myself actively seeking help from others with knowledge beyond my own. It's a really good idea. And if there is knowledge you can share with them..well then the cycle of learning never ends.

In anticipation of Cindy's help, I challenged myself to make the largest stranded knitting design (aka- fair isle, aka- 2-color design) ever in my lil' history. I had parameters, mainly the limit of the width of the machine, which is 200 stitches wide. So I ran with that and this is what I came up with.

I started with the familiar, toothbrushes and houses, and from there, found myself creating new motifs. In my newest body of work, I'm beginning to comment on the wide-range of technology that's seeping into our day-to-day lives, with an emphasis on my dual love and hatred for all these screens. So that's where the satellite dish, iPhones + earbuds, and solar panels are coming into play. (Also you know where the solar panels are coming from.) The design was also inspired by a traditional rug layout. 

One of my inspirations for this design; I saw this rug in a museum on University of Georgia Athens' campus. Not only is the layout inspiring but I love all the little animal motifs!

This design is also a personal reaction/reflection of my own home. The solar panels that were built in my backyard were a source of great pain, but now in the wake of the dust settling, there is still much beauty around me as well as some surprising benefits as a result of the changed landscape. As in, we now get a great view of the sunset. So, there's another duality being expressed in this piece. A sort of harshness (chain-link fence) mixed in with cheeriness (flowers blooming).

Once over at Cindy's, we attempted to bring my DIY computer-knitted design into her pro knitting software called DesignAKnit, or DAK. It worked somewhat, but then I spent the next few hours cleaning it up and adapting it correctly to her program. It is such a cool program -- the next time I find $800 burning a hole in my pocket, I've got to buy this!! Once the design was completed, we hooked Cindy's Tandy floppy drive to the computer -- again, just the cord to adapt the drive to the computer comes at an exorbitant cost. It's basically an emulator function, these sort of external floppy drives were never meant to receive information from a home computer, rather you would buy the disk that had the design you wanted and that was that. We had to export the design into 6 separate tracks due to the limited memory space on my CompuKnit III. Finally, another cord connects the floppy drive to my machine, and we begin the uploading and knitting process.

Are you still following me?? 

Ok, now here's how we actually got to knitting. We uploaded the first track from the floppy drive onto my machine. I get it set-up with proper orientation and I start running the carriage. When we get to the end of the programmed design (carefully cause the machine will automatically begin repeating the design so you hafta hafta make sure you end on the exact right row), we plug the floppy drive back in and overwrite Track 1 with Track 2, and knit again. There's some careful steps that needed to be taken between the designs to make sure they lined up correctly, Cindy and I would speak out loud for every operation so as to be constantly confirming with each other that we had done everything. This went on for all 6 tracks before we were finally finished. 

OH, ALSO during this time, I was attempting to create a gradient with my background color. See, I forgot until the night before our get-together that I would have to to bring all the yarn I needed with me and that I would require more than one ball of yarn to complete the project. That's new for me to need larger quantities of yarn. So in a pinch, realizing that I didn't have enough of any one color, I decided I would used 4 similar colors, and create a rough gradient through changing lines. Knitting 2 rows of new, 4 rows of old, 4 rows of new, 2 rows of old, and finally changing over to the new yarn color. In theory, this made sense to me.

SEE PHOTO BELOW

Was NOT happy with the result (this is the best picture I took of the lines showing). For the first color change, the 2 different yarns were so similar in shade that it looked good. But for the yellow-to-green, and then green-to-blue... I wasn't happy. So more need for ingenuity. That's where the embroidery hoop comes in. I decided to deepen the illusion of a gradient, and remove the harshness of the lines, through duplicate stitch. Basically an embroidery stitch where you're going over the existing knitting with what looks like a typical knit stitch, one at a time. I utilize this technique often to garner the results I desire and to add complication to my design. 

It's a slow process but it's doing the trick! I'm about 3/4 of the way through so when I get it done, I will share a photo asap!

~~~ THOUGHT NUGGETS ~~~
I have been a little reticent about fully automating the knit process, just because to me the making is the beauty, and I never want to take away from the making process. But, I also see the wonder in being able to allow my ideas to come to fruition more quickly. Especially since no matter how many hours there are in the day, I never feel like I can get anywhere very quick. It's in those times when I feel frustrated about how slowly my projects are coming that I remind myself of the journey and how with enough baby steps I can get there one day. Just maybe not this day.

The reality of me being able to further utilize these automated abilities is limited, unless I'm willing to invest in the equipment or if Cindy can tolerate me being over at her house all the time :) but I'm glad to know how they work now and know that it is an option.

~

As to my sewing machines, they're far from gathering dust! I'm playing with making my own underwear, inspired by Amy from Cloth Habit. The idea was sparked from my desire to live a handmade life. Thus, now when I'm in need of a certain material possession, I try to figure out if I can make it first before I go shopping. Not to mention, I see all the scrap fabric that accrues at my 9-to-5 and we've been looking for ways to use as much as we can and throw little away. Amy provides a FREE pattern for this panty (I only customized it slightly with those diagonal seams. That was to cater to the scraps that I was working with) and this has got to be the best style of underwear anyway, so no need to improve upon it!

Finding much needed time outside with my boo thang at the frisbee golf park :)

Hope you enjoyed, thanks for reading!!

Monday, May 11, 2015

Sprang Update

New shipment of yarn arrives = I've got some big plans in the works! I'm starting to buy multiple balls in my fave colors in anticipation of larger projects.

Until then, why don't I share what I've been up to these past couplea months! I haven't been getting as much done as I would like due to now working a part-time job but it's just a matter of time before I rebalance.

I'm starting to explore the differences between hand and machine knitting. These 2 guys are the same toothbrush design, same yarn, same number of rows cast-on, but the left is done on the machine and the right is done by hand. It makes me realize what a loose hand-knitter I am! Doing intarsia color-work on the machine, you can't help but have a tight tension and I'm really enjoying it because it adds a sharpness to the design. Not to mention it now means I can pack in more detail into a smaller space. 

My tiny houses have gone super tiny now with the tight gauge. This guy measures 1.5" x 2.25". Can't wait to start designing these house more intricately, especially since this house is too tiny for any of my tiny frames, hehe.


These toothbrushes tho, I think I might prefer the look of the hand-knit here. See how varied the 2 brushes are from each other? The machine would add a uniformity that I believe would take away from the character of the design. This piece recently sold to a buddy of mine who reached out via Instagram, I appreciate his support! Eventually I would like to put a series of pieces up for sale online, until then, it's been individuals who reach out to me that I'm selling to for now. Still figuring out outlets for my work. 

If you are EVER interested in purchasing something you see here or on any of my web platforms (website, Instagram, Facebook) PLEASE CONTACT ME! If you love it, I want to get it to you!!


I'm now an official member of the Triangle Machine Knitters Guild based out of Raleigh :) they hosted a 5-day spring Knit-In at a local nature preserve that was a great opportunity for me to be in a room-full of experienced machine-knitters. That taught me some many little things about my machine -- like how do I adjust the volume? Is my frame set up right? It was great. Not only are they talented but fun company as well.

Got some knit inspiration off the TV the other day -- I couldn't figure out how they were knitting and purling with the same yarn but getting 2 different colors. When I brought my sketchbook in to the Knit-In, I was instantly taught about plating. Plating is where you carry 2 yarns as you knit, where one color is carried in front and the other in the back. This way the purl side will be a different color than the knit side.


Not only did I learn what plating was, but I learned I could do it on my machine! Mine came with a plating yarn feeder that can hold the yarns front and back.

Here is my first sample with the plating yarn feeder. I love the way that the contrasting yarns create a flecked sort of look. This swatch is way too stiff because I used 2 fingering weight yarns. To create a really nice fabric, I need 2 yarns that when combined, make a standard fingering weight.

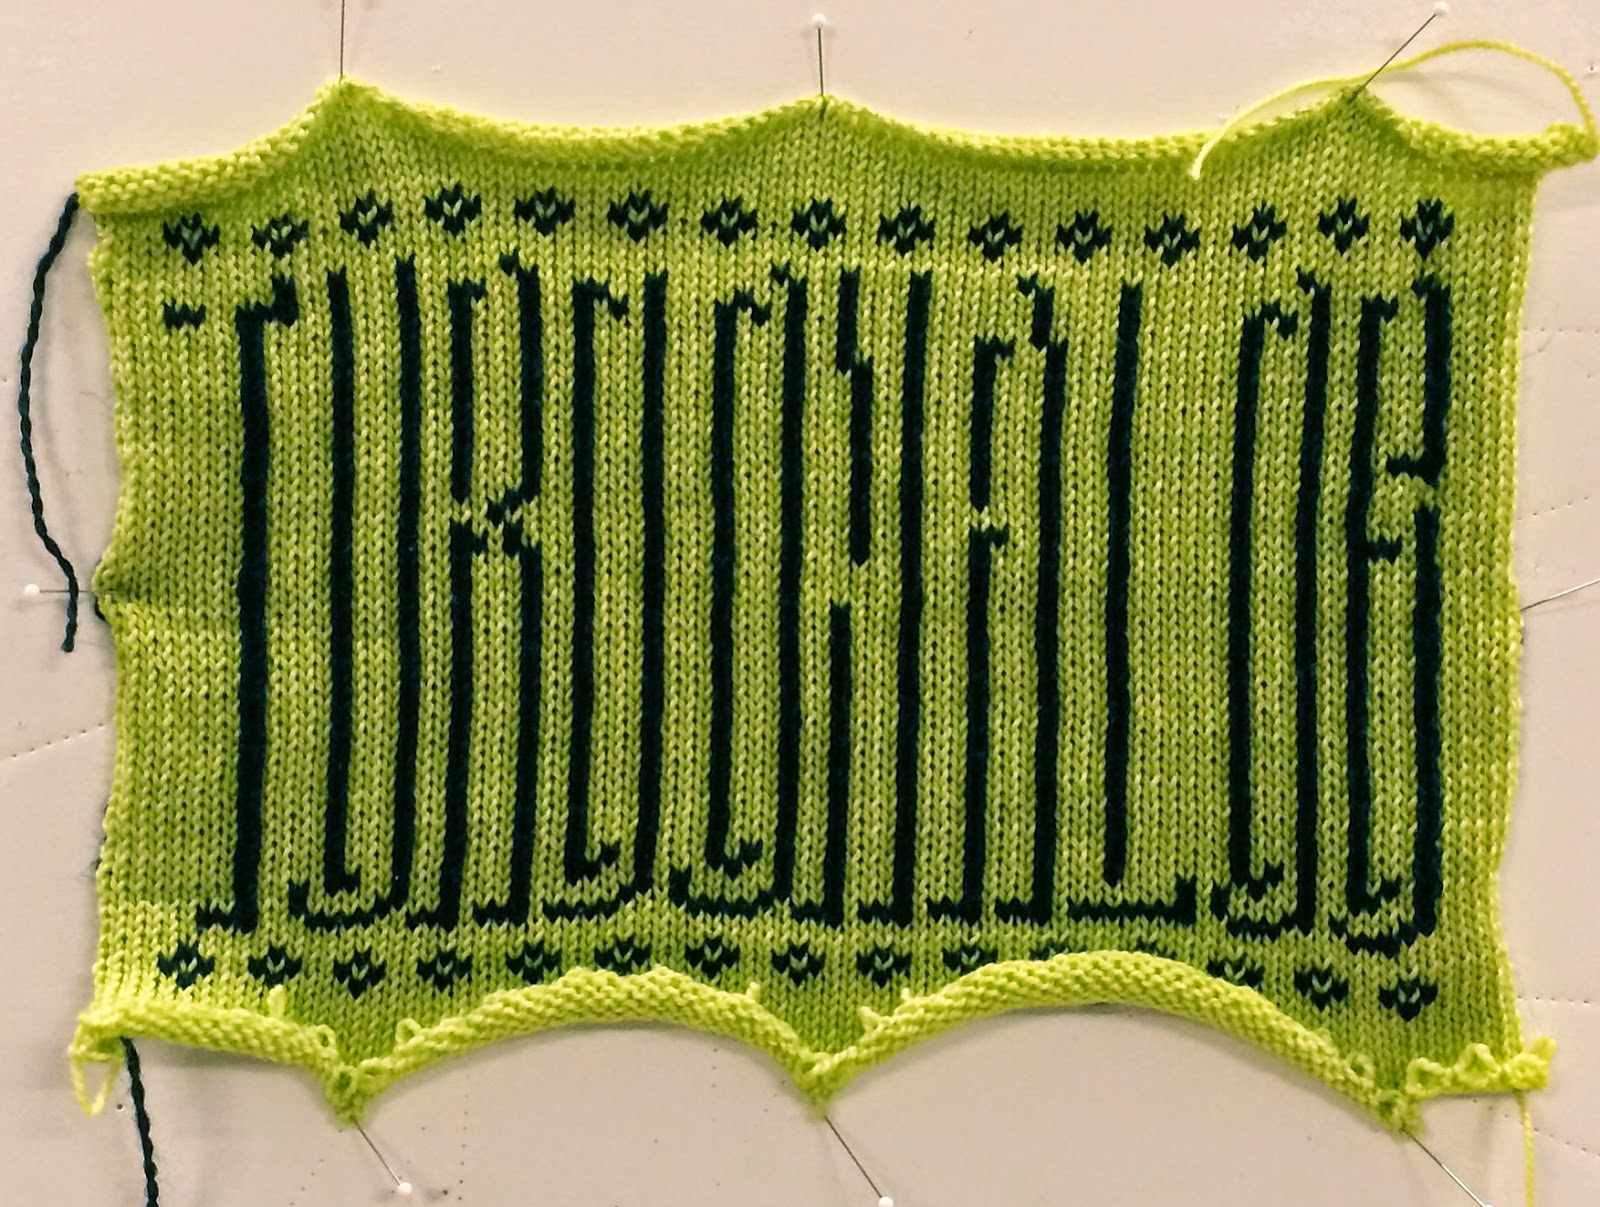
Here is a piece I got done during the Knit-In. Can you tell what it says? I'll give you a hint: the dark lines are the shadows of the letters. I originally knit this design at home, and had my fair share of trials-and-errors...

...the biggest lesson being 1) I can't watch TV and machine-knit like the way I can by hand, and 2) understanding how to correctly flip my design so that it comes out the right way. See, when you knit by machine, you face the purl-side of the fabric (aka, the back-side) so you can't really see the finished side until you cast-off and remove it from the machine. After knitting my writing backwards not once, not twice but 
3 times (that's where the not-watching-TV lesson was learned), 
I finally realized what I was doing wrong. I would flip my pattern in the computer and then read the chart top-down, which would flip the pattern again. Flipping twice means backwards letters for me.

After maintaining my zen and dutifully ripping back, I finally got it right. Alas, even then I came to the decision that this bit of cryptic text might be too cryptic. So I decided to knit it one more time (the green one above) and loosen the tension (allowing more space between the letters) and shortening the letters overall. It's still tricky to read but no one said understanding art was easy!! Also framing it properly and being able to stand back from it helps :)

Did you guess what it says yet? TURD ON A LOG, duhhhh!!!! It's a phrase I use often when I feel like I'm not getting anything done, or I've watched too much TV and not done the laundry. I have no idea where it came from but it has become a part of my regular, nonsense lingo.

Ok, so maybe understanding art can be easy too.


This is another quick study I did at the Knit-In. Here I was inputing single motifs (one bird or one flower) and then using the machine's computing abilities to repeat and flip them as I desired. For me, this is where this software makes sense. I wouldn't want to input a large design like "Turn On A Log", especially if I know I only want to knit it once. I would rather input small motifs and have fun repeating them in various ways.


I've got some big plans for the next few months, focusing on my goal of scaling up. Now if all these friends of mine would quit being so happy and getting married then I would have more time to knit!!

Stay tuned...

Wednesday, March 11, 2015

Learning How To Knit Again

Y'ALL, I got the grant!!

My first grant-writing experience, and I got it! In a previous post, I detailed my journey in pursuing the grant and I'm pleased to inform you that my hard work paid off, and I danced alll the way back from my mailbox when I got the news. And I've got a looong driveway! You know, I had almost given up on receiving anything on my first try. This whole art career thing is full of rejections, and it makes things easier if you keep your expectations low. I'm not saying to always view the glass half-empty, but it helps to keep reality at hand in an attempt to protect your self-esteem. 

SO, I wrote the grant to ask for funds to buy a knitting machine. And now that I have one, I have to prove that it will further my career in the next year. In fact, that is part of the process. January 2016, I will be submitting a final review of how I spent my grant money and how it helped me. Not only is it a way to hold yourself accountable with others but a supreme kick-in-my-butt to learn how to use this machine as quickly as I can.

Above are some of my first test knittings, using the 2-color stranded pattern function on my machine. I designed the single-motif and repeat patterns in my computer, manually input them into the machine's primitive, electronic system, and then you're ready to knit!

My first time repeating a single motif -- toothbrushes, of course :)

My intimidation quickly dissipated as I started working my way through the manual. I forget that I am capable at understanding basic machinery -- things like oiling generously and looking closely at what's moving where. With enough patience, you remind yourself that it's simple mechanics.

The machine, in a way, works backwards. You see the purl-side (or wrong side) from where you are sitting and you have to go around to the other side to see exactly what you are doing, hence the view in the picture above. 

It's hard to take good pictures of the machine but mine has found a cozy nook bumped up next to the record player. Over this past weekend, I executed my first real project with the machine. That meant using nice, wool yarn that I paid money for. Needless to say I was a little uptight at first but there's no better way to learn than to throw yourself in the ring. I decided to start with an intarsia design because I have a death wish and why would I start easy? I mean I already bought the finest gauge machine there is (aka- smallest, hardest-to-see, general feeling like your fingers are way too big when attempting to fix any mistakes, etc) so might as well add a dozen balls of yarn into the mix. 


DISCAIMER: For anyone who thinks that buying a knitting machine is cheating, making things easy or automatic in any way, I'd like to debunk your assumptions right now. 

Hand-knitting is WAY easier than this!! You can control everything much better since it is all in your hands or lap. With this machine you have up to 200 needles that you need to keep an eye on and god help you if you lose a stitch (or worse a dozen stitches),  those babies run faster than you can blink. Just because it says this machine is electronic doesn't mean that it's automatic. You push that carriage back and forth for every row of knitting. In fact, you don't ever plug it in unless you're wanting to use the electronic pattern functions, and in that case, all the machine is doing is moving your needles into the correct position for you. You're still pushing that carriage.

What the machine does well is allow you to knit larger, faster. It really feels much more like working on a loom rather than the hand-knitting I'm accustomed to. Especially doing intarsia color-work, it reminds me of tapestry weaving -- that's where you lay the yarn by hand into each needle, depending on what color goes where, and then push the carriage across, controlling the tension of each yarn ball with your free hand -- The machine is more physically enduring than I expected. The carriage requires more force to run across the bed of needles when doing intarsia. Also my tension was pretty tight which is something I need to troubleshoot. That requires the machine to work even harder.

And of course I was knitting for hours on end because I was so excited about it all. Doing any physical activity for 6 hours will leave something in your body aching.

 So what do you think?! It was fun not getting a chance to really see the work until I took it off the needles. It turned out even better than I imagined! There's a fair share of mistakes in there, but I left them in, allowing them to be badges of my learning process. Also probably didn't know how to fix them anyways, hehe. The toothbrushes are nothing new for me but it was smart to start with a design I was familiar with, that way I could focus more on the learning aspect.

This piece ended up around 21" x 18". I used all but 4 needles on the bed. That means that this is about the widest I can go. If my tension was looser it could be a little wider. I'm surprised because when I decided I wanted to scale up, I was imagining a lot larger than this, and now I'm seeing the limitations of the machine. I think this means I'm going to need to work in sections and seam edges together to get the size I'm after.

Look at all those tiny stitches! By the time I cast off, my row counter was at 270. I had so much fun, I can't wait to start my next project.

Also this past month, I've been working on a new batch of "smalls". Mostly, tiny houses but also have some lil' toothbrushes. 

I'm hoping to put a series of pieces up for sale online in the near future. The good and bad of this idea is that I'm selling these little houses to my friends and neighbors faster than I can make them! Facebook has been a great platform where people have been reaching out to me about purchasing pieces (you can find me here). If you are ever interested in buying any of my work PLEASE let me know! We can work something out. I'm always open to trades and price negotiations. I need people to buy my work so it has a place to hang and I can continue making more. My house is too small to hang it all!

Quonset hut!! Wish I had one of these in real life.

SIDE NOTE: My beautiful, little niece turned 2 this past month and I can't fight the desire to make her beautiful things. This year I made her a lovely, knitted bunny that is the perfect snuggle size. I hope it brings her happiness!
Free knitting pattern for this bunny available here.

Have a great day!